Set up mail in Samsung Galaxy A8 Star (A9 Star)

How to configure mail in a Samsung Galaxy A8 Star (A9 Star)
All Samsung devices with the Android 8.0 (Oreo) operating system come with a default email application that allows you to receive and send emails.
You can add as many email accounts to your Samsung Galaxy A8 Star (A9 Star) as you want, this way you can read, reply and send new emails from your Galaxy A8 Star (A9 Star).
Before starting the email setup on your Galaxy A8 Star (A9 Star), make sure you have the following information:
- Email address ([email protected])
- Password.
- In the event that it is not a Hotmail, iCloud, Microsoft Exchange, Gmail, Yahoo, Aol, Office 365 or Outlook account, you must know if it is a POP or IMAP account and both the incoming and outgoing servers.
Estimated time: 10 minutes.
1- First step:
Find and open the mail application in your Galaxy A8 Star (A9 Star), normally Samsung devices with operating system Android 8.0 (Oreo) come with the Gmail application installed or with Samsung's own mail application, You can use the Gmail App or the Samsung App to set up your mail, regardless of the provider, even if it's a company email with a domain of its own. If you can not find it on the home screen, drag the screen to the left or right until you find it, if it does not appear, access the Samsung Galaxy A8 Star (A9 Star) menu. Your Samsung must come from the factory with an email app otherwise go to Play Store, search and download Gmail, Outlook or Blue mail.
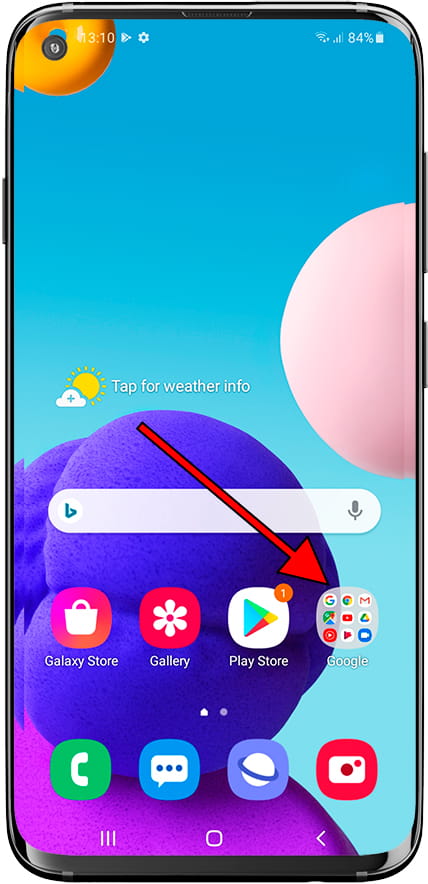
2- Second step:
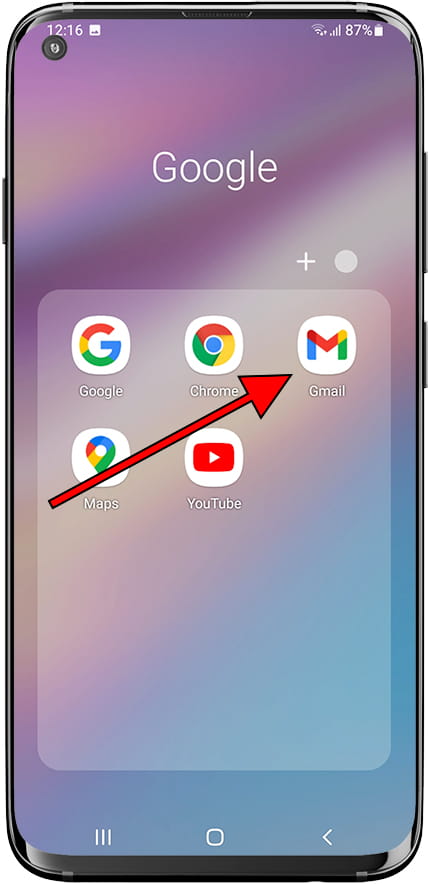
In the Google applications folder, all Google applications are grouped where you can find the Gmail application, it is the icon with a capital M. Click on the icon to continue.
3- Third step:
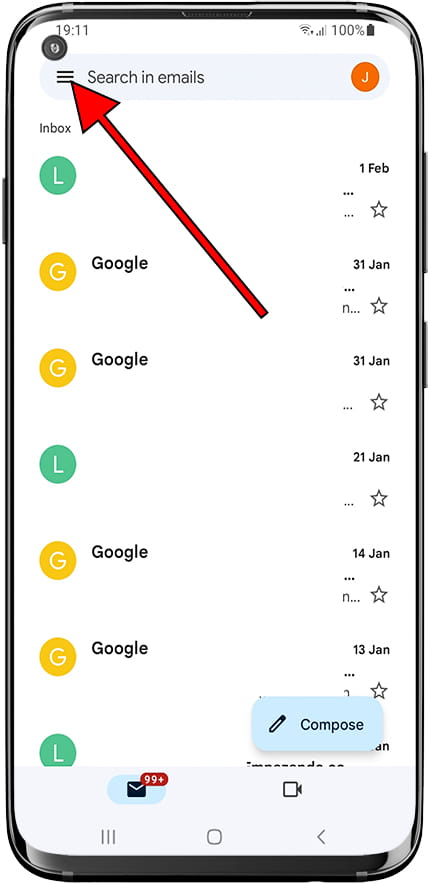
Click on the menu in the upper left corner to go to Gmail Settings on your Galaxy A8 Star (A9 Star) it is the icon with the three horizontal lines.
4- Fourth step:
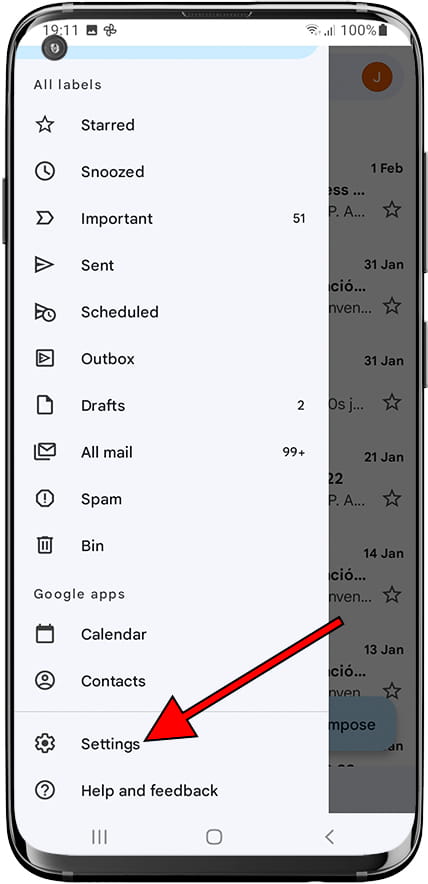
If you don't have any account configured on your Samsung, the "Add account" option will appear; otherwise, scroll down until you find the "Settings" section, press to continue.
5- Fifth step:
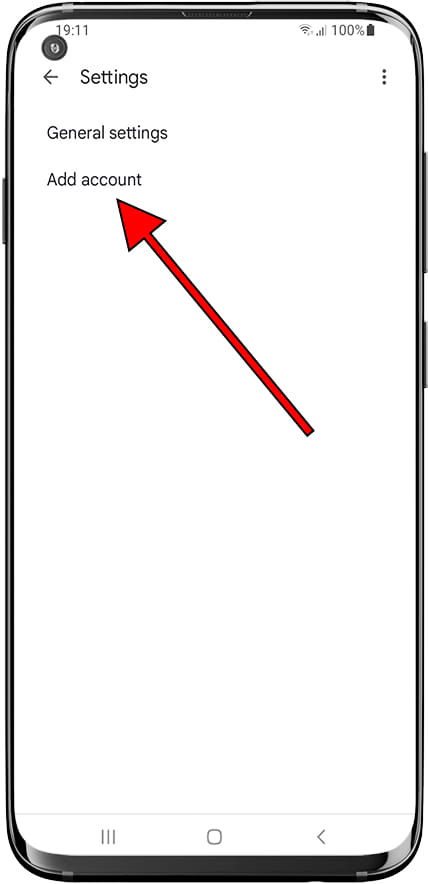
Within the settings of the Gmail application of the Galaxy A8 Star (A9 Star), you will see "General settings" and under this option "Add account" will appear, press to continue.
6- Sixth step:
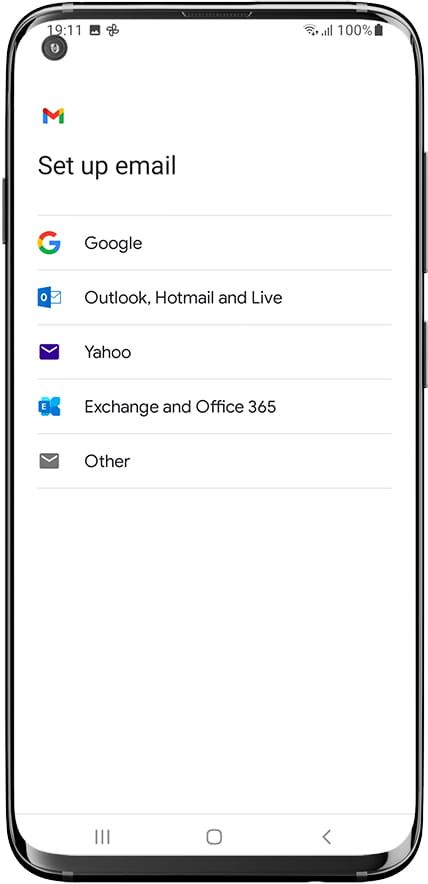
At this point you can choose which email account you want to configure on your Samsung Galaxy A8 Star (A9 Star), a Google account, Outlook, Hotmail, Live, Yahoo, Exchange, Office 365 or an account with its own domain (for example a company account), if your case is the latter, choose "Other service".
7- Seventh step:
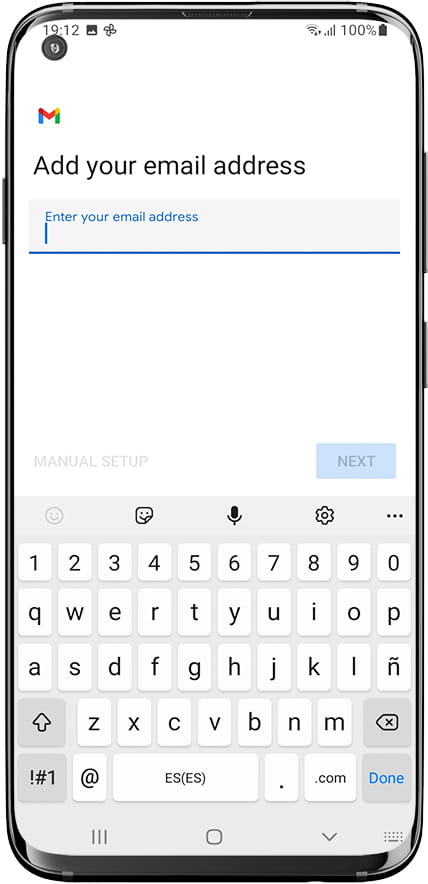
In the case of Google, Outlook, Hotmail, Live, Yahoo, Exchange or Office 365 it is only necessary to enter the email account and the password, if you have your own domain or another mail service, write the email address you want to configure and click "Next".
8- Eighth step:
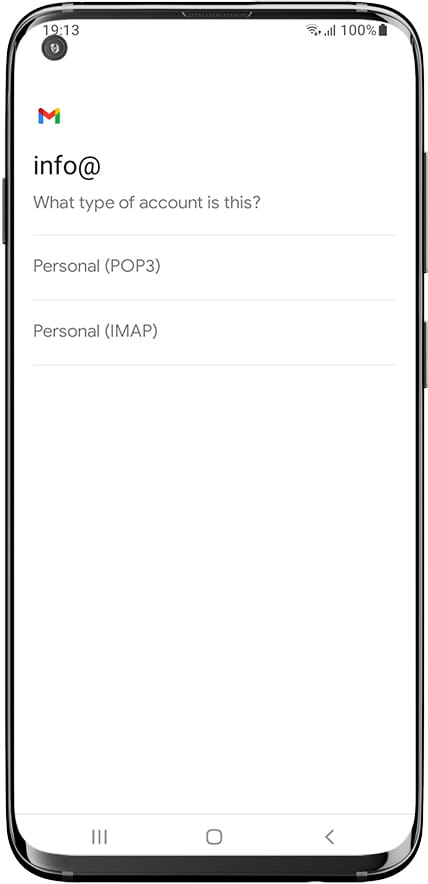
Select the type of account you want to configure in your Samsung Galaxy A8 Star (A9 Star), IMAP or POP.
What differentiates an IMAP account from a POP or POP3?
When you set up an IMAP account in your Galaxy A8 Star (A9 Star) you keep a copy of the emails in the cloud, that is, in the mail server.
If you delete an email or move it from a folder in your Samsung Galaxy A8 Star (A9 Star) that change will also occur on the server and therefore on all devices that are configured with the same email account.
On the other hand, if you set your Samsung with a POP or POP3 account, the emails are downloaded to the device and can be deleted, read or changed without affecting the other devices that have the same email account.
Usually this configuration is used for shared accounts in which several people want to keep the emails that have been read by others as NOT read or for those who have the email in the mobile and on the computer and do not want the changes to be reflected in the other device.
9- Final step:
Enter the password of the email account you want to set up on your Galaxy A8 Star (A9 Star).
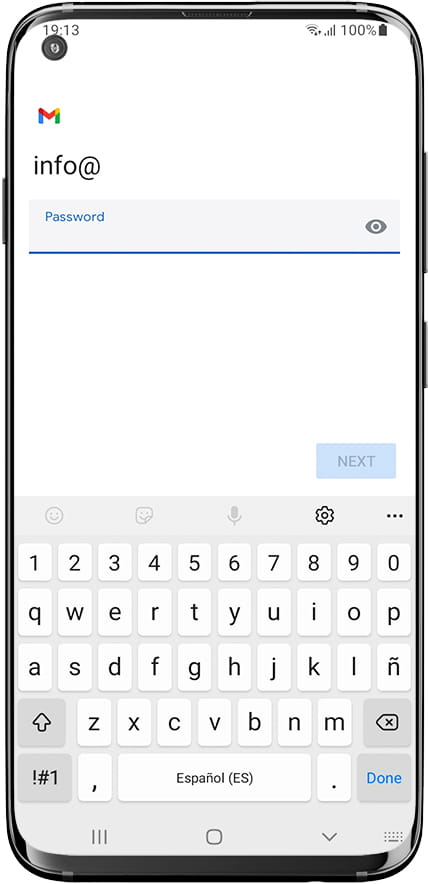
10- Final step:
Proceed to configure the incoming server, firstly as username, enter the email account that you are configuring and its password, in server you must enter the incoming server, normally mail.yourserver.com or imap.yourserver.com (changing yourserver.com with your domain) in any case check with your mail provider the configuration.
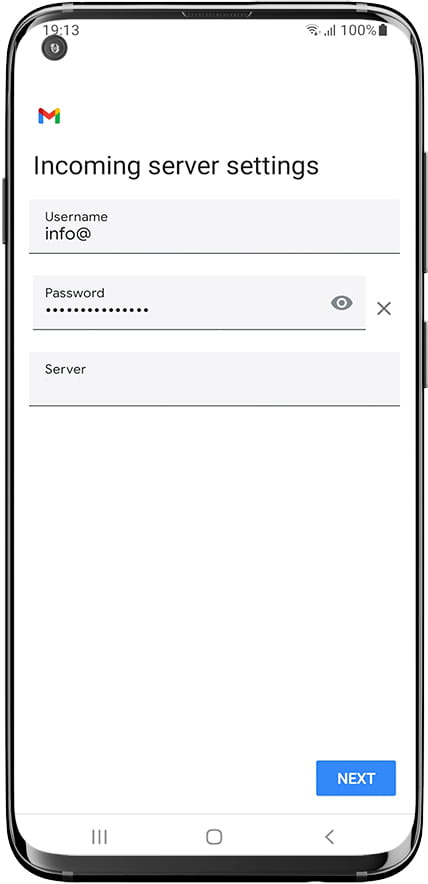
11- Final step:
The outgoing server configuration is similar to the incoming one, as username, enter the email account that you are configuring and its password. Enter your outgoing server or SMTP server, press next to continue.
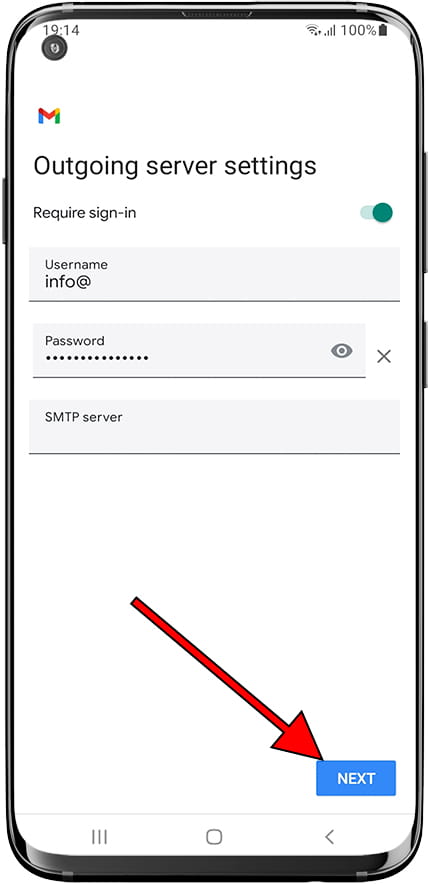
12- Final step:
Now, configure the synchronization options of the email account, choose how often you want the Galaxy A8 Star (A9 Star) to check if there are new emails to download. You can choose if you want to receive a notification every time an e-mail is received.
Check the option "Synchronize mail from this account" if you want them to be synchronized automatically, if you uncheck it you will have to access the mail application and update to receive the e-mails. Choose if you want attachments to be downloaded automatically when connected to a Wi-Fi network. If you want to save battery and mobile data on your rate, uncheck all these options.
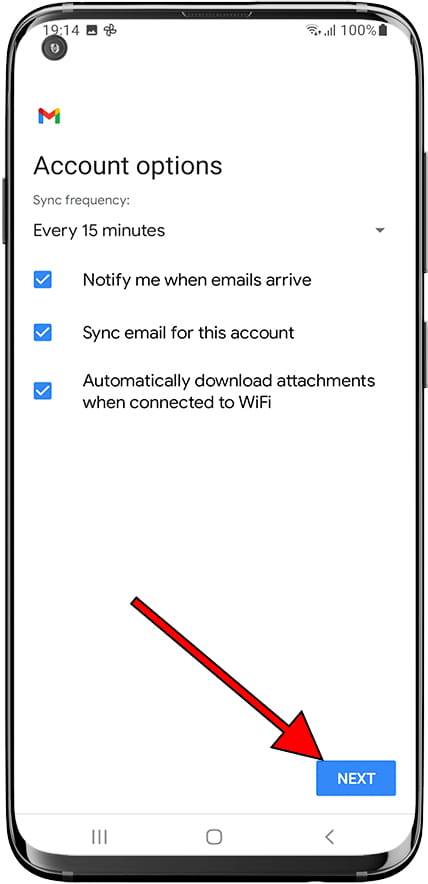
13- Final step:
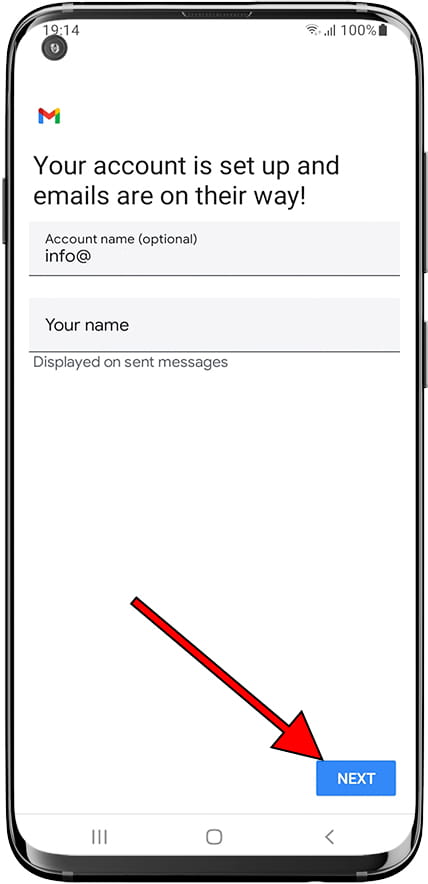
Finally, you can give a name to this email account that you have just configured in the Galaxy A8 Star (A9 Star), the name of the account may be different from the email address. Type the name you want to appear on messages sent from this account.
In your Galaxy A8 Star (A9 Star) you can store your emails thanks to its internal memory 64 GB.
You can connect your Galaxy A8 Star (A9 Star) through Wi-Fi thanks to its connectivity Wi-Fi 802.11 a/b/g/n/ac, dual-band, Wi-Fi Direct, hotspot and download all emails and attachments.
If you need to check the mail from your Galaxy A8 Star (A9 Star) anywhere you can download using the network connection HSPA 42.2/5.76 Mbps, LTE-A (3CA) Cat9 450/50 Mbps.
If you want to remove a Google account from your Galaxy A8 Star (A9 Star), either to set up a new account or to sell or give the device away, click on the following link and follow the indicated steps: Delete Google account on Galaxy A8 Star (A9 Star)


